Pages

Showing posts with label CAS Mix Up Challenge. Show all posts

Saturday, 4 June 2022

'Hello'

 The New Challenge over at Color Hues
is live and looking for Black and Yellow
I saw a card similar to what I made over on Pinterest
and it is perfect for the CAS Mix Up Challenge
(Welcome back)


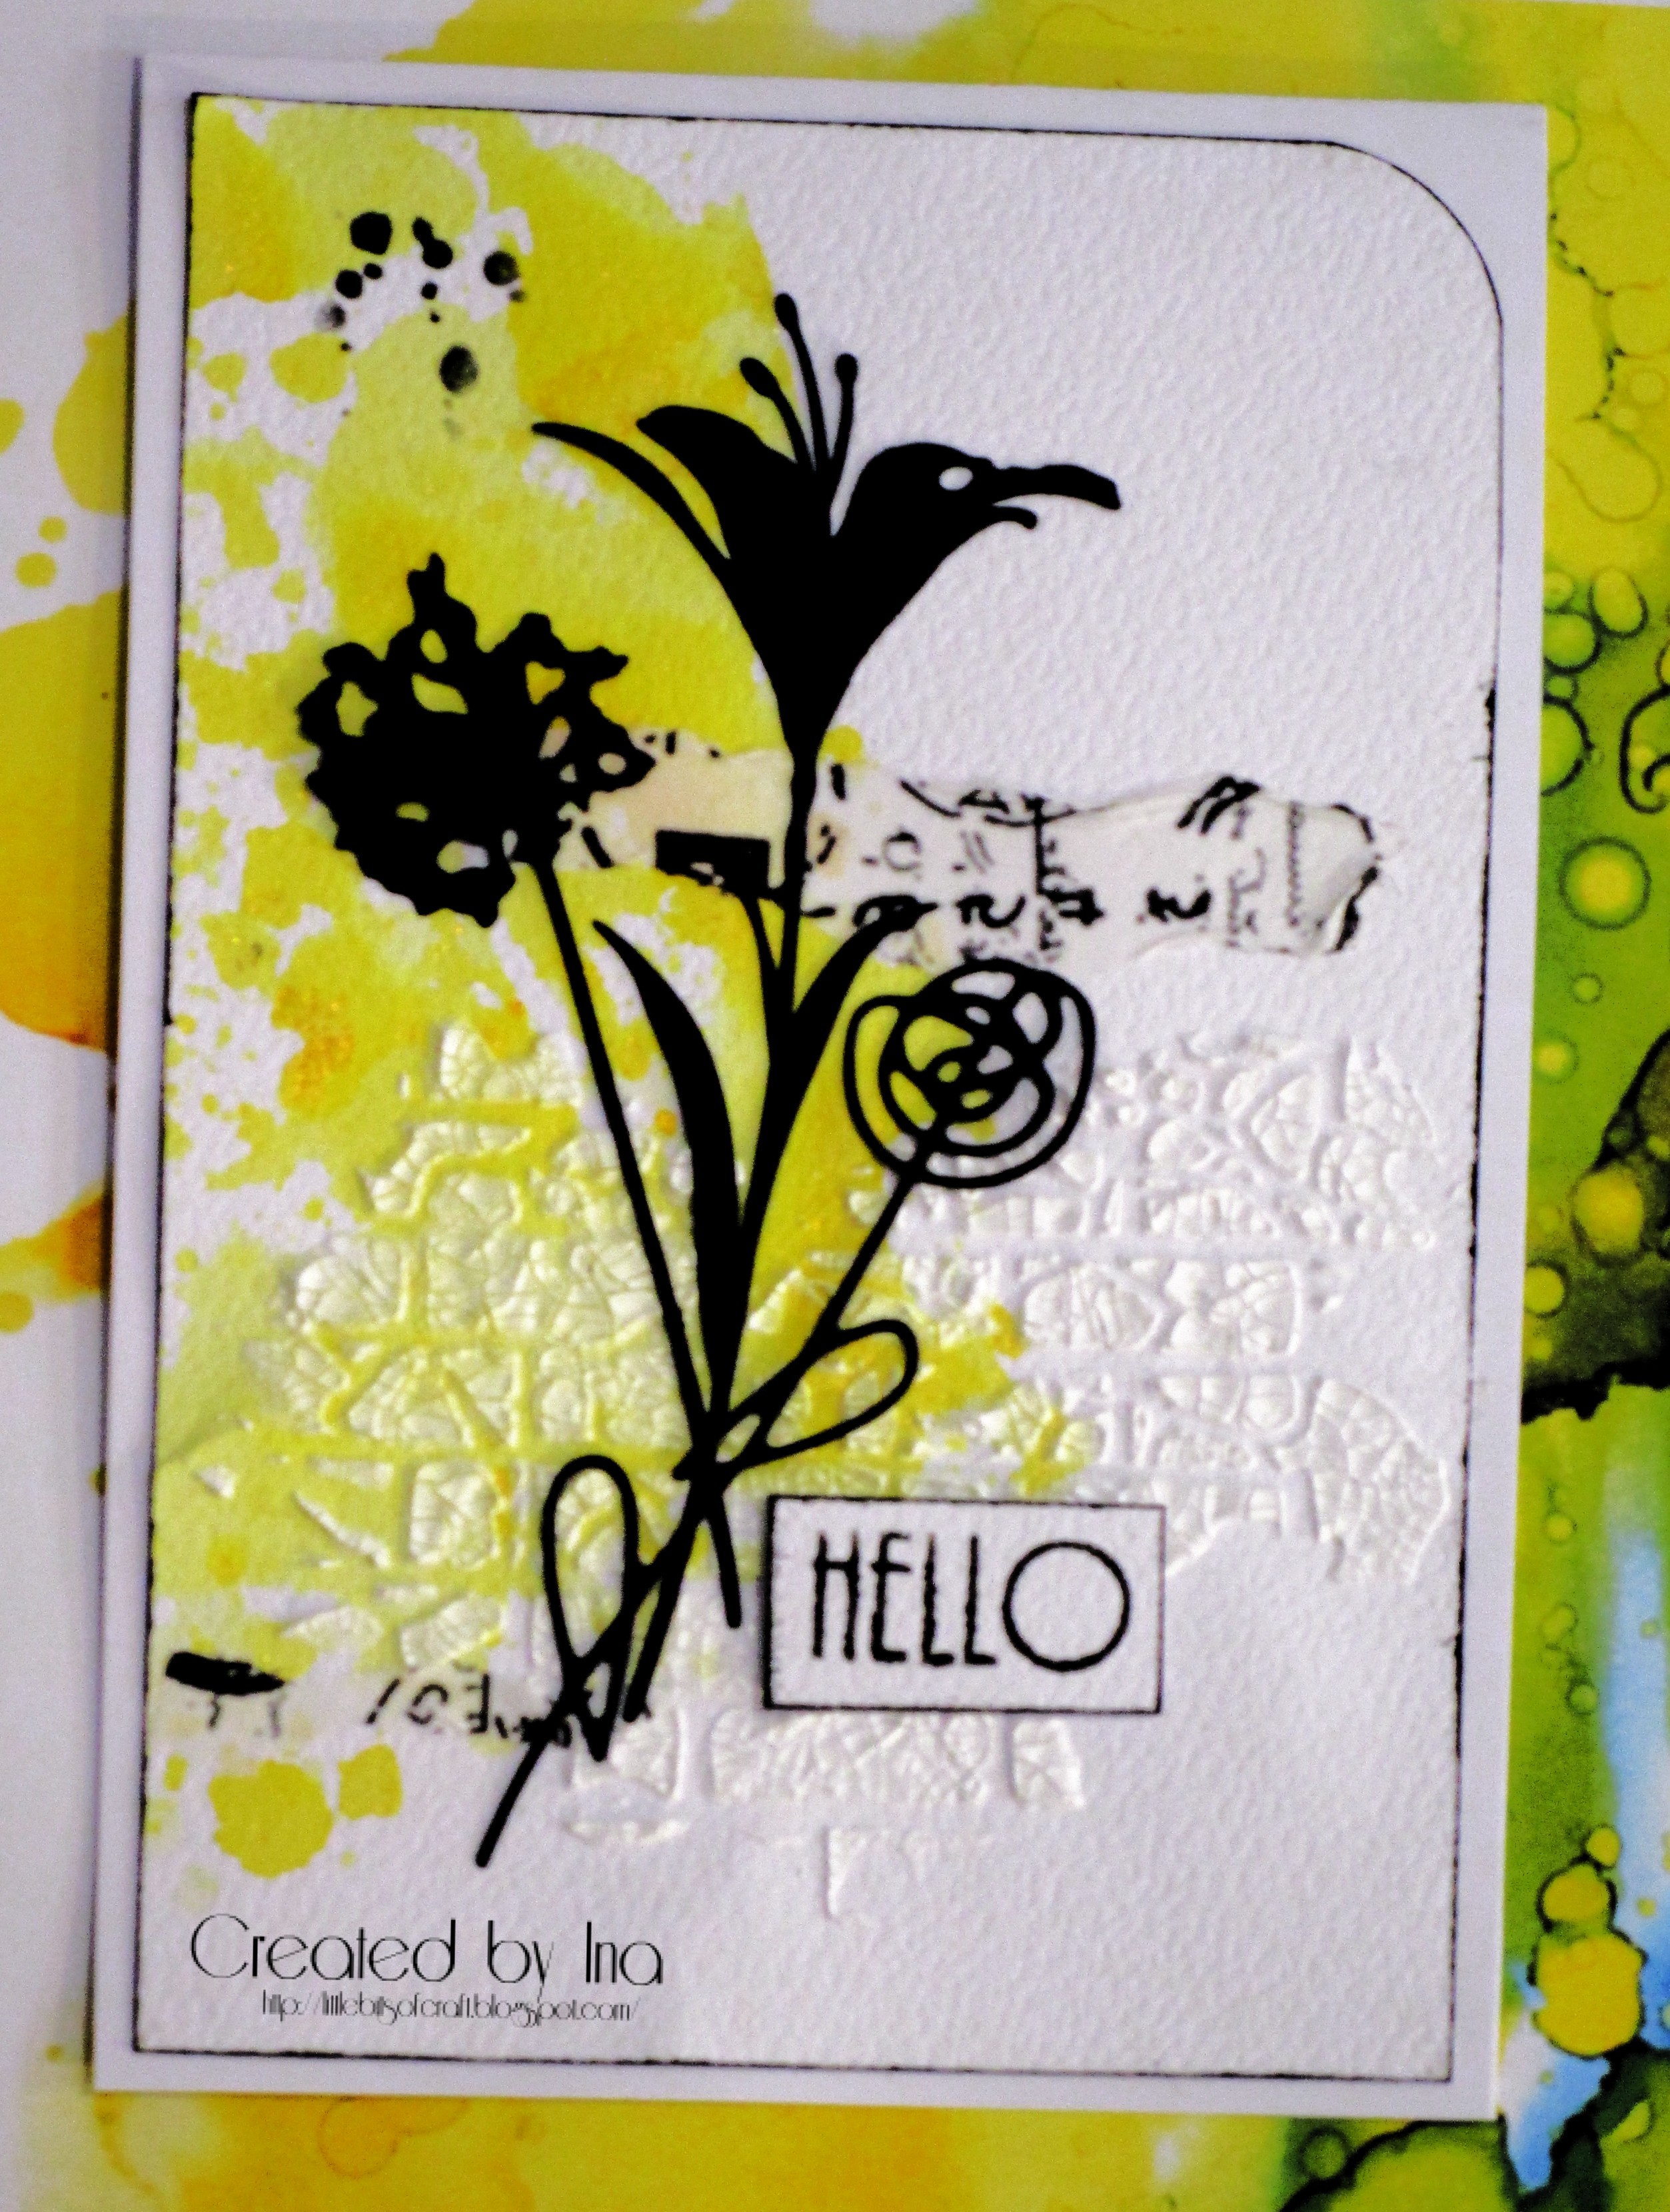
You all know how much I love my stencils and 
Lindy's Magical's so these two challenges
just made for some fun play time.
Lots of die cutting as I didn't know which ones I would use.
(I have leftovers)
My yellow background is Lindy's Yellow Rose of Texas,
Stencil is AALL&Create Cracked Walls 1 #37
through Ranger Opaque Crackle Texture Paste.
Added itty bits of washi tape Cut Tear Layer #9 
and a touch of Tim's Speckles in the corner.
Simple sentiment from STAMPlorations,
inking the edges as I did before adhering
to white card base.
* My CAS Mix is Smooching,Texture Paste, Stencilling, 
Die Cuts, Washi Tape, Stamping.
* Black & Yellow colours for Color Hues
Thanks for popping in and checking my card out.


Tuesday, 18 January 2022

It's Your Day

 The first thing I noticed when I saw the 
was the beautiful card by my friend Nancy
and I commented to her at the time I would like to
watercolour one of the STAMPlorations In Bloom stamps
that we both have and use Lindy's Magical's too.
Thanks Nancy for being my enabler. 
I finally got to make it.
I used the In Bloom Precious Plumerias
with a variety of bright coloured Lindy's Magical's
and Ken Olivers Metallic Metals
after heat embossing in white onto
Canson WC paper.
Wetting my paper I let the fun begin
adding colours till I was happy with the result.
Added some splatters and sentiment from
Inspired by Stamping (no longer in business)
Attached to metallic card base to blend with the
watercolour cream colour.
I have had a blast playing around with different
loose watercolouring. Something I haven't done
with stamped images for ages. Now makes three LOL
My Mix is - 
Watercolouring, Magical's, heat embossing, 
stamping, splattering.


Thanks for visiting.
Catch you again soon.


Sunday, 16 January 2022

Sending Hugs

Having a little fun play time for the
CAS Mix Up Challenge and for the first one of the year
we are to do loose water colouring.
Details Here


I thought I would try something a little different 
by die cutting my images with acetate and inking
but was too thick so were then cut
with watercolour paper. While they were still together
I wet the paper and sprinked with Lindy's Magical's
in Alpine Ice Rose, Cathedral Pines Green
and Nuvo Cherry Bomb Shimmer Powder. 
After I had taken them out
I sponged through the negative cuts to use as a background, 
adding more colour to the die cut flowers as needed.
I then added some Distress Grit Paste through
Tim's Speckles stencil before adding the flowers
 in a different order to the front using the 
back watercolouring as a shadow.

Here's a close up. I had a hard time getting a clear photo
of the whole card.
Hope this qualifies as loose watercolouring.


Added a sentiment from a CB tag die
and tied a pink cotton bow.
Attached to card base to complete.
My Mix is - loose watercolouring, sponging, stencilling,
die cutting, stamping.
Hoping to make a more traditional 
loose water colouring card before the end of this challenge.
I am having so much fun.
Thanks for a fabulous Challenge.


Sunday, 17 May 2020

My CAS Mix Up Resist Make

Hello and Welcome.
It's always fun to try new techniques and this month at
CAS Mix Up we are asked to try our hand at Gesso Resist.
This is something I haven't done with gesso.


 I chose to create my card with the technique that Susan used
from a You Tube Tutorial by Kim Schofield Here.
 I made several attempts and a few didn't make it
but after inking this one above maybe those throw away ones
may not have been so bad after all.

I blended Tim's Oxide inks and once dry
added some water splatters.
Continued on by randomly stamping Prima Marketing Fire Fly
 with some circles from the top of a water brush.
My main image is from Inspired by Stamping
which is unfortunately no longer in business.
I have had this set for quite a few years and this is
it's first inking. Shame on me!
I wanted to brighten the colours so
brushed on a coat of gloss gel medium.
I was undecided what colour to use as my base.
I had a black frame on white base then vice versa
but liked neither and came up with just a touch of black
and scoring around the white card base.
My sentiment is a sticker from Tim Holtz.
Thought it fitted nicely with the stamped  image.
That's my card done.
My Mix is - Gesso Resist, Gel Medium, Stamping,
Inking, Scoring, Stickers
I am popping this over to the
NBUS Challenge #14 where we play with
Never before Used Schtuff
(mine is the stamped image)


Thanks for dropping in today.
Really appreciate your kind comments.


Thursday, 12 March 2020

An Easy Peasy Pour Card

I have an 'easy peasy' CAS card for the Acrylic Paint Challenge
over at CAS Mix Up


Happy Birthday to
and Thank You for the amazing technique challenges
you give us each month. 
***
I did an Acrylic Pour at a Craft Show way back
and I had leftovers so quickly did some smooching
and cut out my CUTplorations Flutter Zen 1 and 2 dies.
Added a gem then attached to die cuts from
Uniquely Creative Cross Stitch Nesting Arches
which were slightly popped.
Finished with a die cut Birthday Sentiment,
 some tiny STAMPlorations inked hearts in
Memento Eldenberry
which just seemed to finish it off nicely
and attached to white card base.
Unfortunately I couldn't get a decent photo showing
the Arches so here is A close up!

My Mix is Acrylic Paint, Acrylic Pour Leftover,
Stamping, Die Cutting, Gems.

Thanks for popping in today.


Sunday, 2 February 2020

I'm Guest Designing at CAS Mix Up Challenge

I was tickled pink when I was chosen as the Top Pick
for the Oxidized Metal Challenge in November
 Bonnie and Loll have kindly 
 invited me to be their February Guest for


What a fun challenge this was.
Certainly got my thinking cap on. 
Of course there are a few tutorials included
to help you with which way you want to go.
I started with cutting my
 Kaisercraft Textured Weathered die with acetate
and inked over it with Tim's Oxide Peeled Paint.
I then cut out another die, inking with VersaMark
and adding Little Birdie Frosty Fizz Embossing Texture Paste
heating it till it bubbles up. 
To add a little extra I cut the same die with a scrap of pink paper
then added Art Alchemy Royal Robes Wax,
 popping it on top slightly to the side.
Sentiment is from SU Lotus Blossom
inked with Memento Angel Pink.
Kicking myself as I should have inked
it in a darker colour.
Added some splatters, inked the edges
and attached to card base.

Thought I would show you the dies and stencil cut outs.

My Mix is Die Cut Stencils, Stamping, Sponging,
Splatters, Heat Embossing, Waxing.


Be sure to pop over and see what the
Talented Designer's created for your pleasure
and join in this month's Super Mix Up Challenge.

Sending this CAS card over to Try It On Tuesday
and fits in with the White Space requirement.

Thanks for dropping in and love reading your thoughts.
I'll pop back later in the month to give you a Reminder
for the CAS Mix Up Challenge.


Monday, 6 January 2020

You're Special

Hello there! Welcome to my Blog.
How often do you make a card for a specific challenge,
leave it overnight then finish it off the next day
 and then find out it is suitable for another?
Doesn't happen to me very often but this card did just that.
It's for the Cool Colours Challenge
and the CAS Stencil Challenge using a


This card was started specifically for the WC Challenge
but after looking at how plain the front was I thought it
needed a little something - hence the random stenciling
(I know it's only an itsy bitsy bit)
with white texture paste. It's
Tim Holtz - THS102 Layering Stencil
and purchased just before Christmas after I saw
a girlfriend use it - and had to have.
This was when I decided to add it to the Stencil Challenge above.
Thistle image is from Lavinia Stamps, heat embossed in black
 and coloured with Lindy's Magical's in 
Witch's Potion Purple and Cathedral Pines Green.
I cut out the front with MFT Peek a Boo square die
 and went my merry way and popped it to my Thistle 
forgetting that I hadn't added 
my STAMPlorations sentiment - bummer. 
That meant I needed to die cut it
just in case my stamping didn't turn out.
Adhered it to white card base.
I will keep this card and give it to my sister
for her birthday in a few months time.
I'll be back before the end of the month to 
play again and with more stenciling lol.

Happy 1st Birthday to CAS Stencil Challenge
Where did that 12 months go?
Congratulations Loll and everyone involved 
over the past year. You have done an amazing job
and  I am sure we will see you around for
so many more encouraging us to
put our stencils to good use. 
Thanks Bunches!

 Till next time - Cherrio from


Sunday, 5 January 2020

Life is a BEACH

Hello and Welcome. 
The first challenge for the year at CAS Mix Up Challenge
is up and running and what a fun one it is.

Have you tried this technique before?
There are Links to help you get inspired. 
Check it all out Here

Here's what I came up with -


It's certainly beach weather here in Australia as we are
experiencing scorching hot days and when I saw the
Inkadinkado Flamingo Fun stamp set I thought it perfect - 
just had to work out how to do a Partial Die Cut.
I went with this one from Jennifer McGuire.
 First off  I coloured the heat embossed flamingo using
 Nuvo Catherine Wheel with a water pen,
the hat and bag with Tim's Oxide Salty Ocean
and the hat trim and flowers with
Finnabair Fresh Orange Metallique Paint.
This was partially die cut with Spellbinders Hexagon Die
moving it along to cut the other side.
That didn't look right so I hand cut
the left side of the flamingo.
Heat embossed the sentiment from the same set.
I thought the flamingo needed some sand to stand on so
added Sandstone Brusho's to Distress Grit Paste
and carried it over to the background.
This was smooched with the salty ocean oxide ink
as is the side of the flamingo.
Again I thought there was something missing
so added some stitching from one of the
Lawn Fawn Stitched borders.
It's a little hard to see but the partial die cut flamingo is popped.

My Mix is - Partial Die Cutting, Stamping,
Watercolour smooching, Texture.

Till next time! Cherrio from 


Monday, 18 November 2019

Perseverance Pays

Hello and Welcome to today's post for the
The heading says it all!


After spending an afternoon trying 
This technique from Jay Soriano 
all my efforts landed up you know where.
It wasn't as easy as it looked BUT I was
determined to keep trying so the 
following day it worked. Yay!
So happy with the result
but has taken me an age
to try and get a decent photo with the silver foil
and soft stenciled background.
I used SU reinkers in
Rich Razzleberry, Brilliant Blue
Mossy Meadow and Yo Yo Yellow.
Some of these colours got lost in the drying
but happy that I got a pattern from it all.
Cut it out with a stitched die and
attached to white card base.
Added a die cut in silver and finished with the
silver strip on the side.
Sentiment is from STAMPlorations.

A close up

My Mix is Oxidized Metal, Stamping,
Stenciling and Die Cutting.
Thanks to Susan for  picking this technique
enabling me to try something new and completely different..
Great inspiration from the Designers.

Till next time - Cherrio from


Friday, 8 November 2019

Coging along to say Hello

I am really enjoying playing with the 


I played around with embossing powders here
going by This Tutorial by Theartfulinker.
I saw this card on Pinterest Here and loved it
thinking it case perfect for this challenge.
As I had gold paper out on my desk I decided to 
play around with that starting by embossing it with
Kaisercraft Cogs. Then the fun began by
heat embossing bit by bit in different colours.
I used WOW Chocolate Caramel Pearl
Colour Blast Deep Water, Lindy's Pumpkin Fiesta
and thought the Stampedous Aged Copper Embossing Enamel
would add interest but didn't turn out 
as pronounced  as I thought it would.
I then decided to add a few Finnabair waxes in
Rich Copper, Mint Crackle and Peacock
adding a bit more shimmer
(as if there wasn't enough)
I cut the three panels out and backed them
 with gold paper. I was going to add metal cogs
from my stash but then remembered I had dies
from Craft Emotions so cut them out with the same gold paper.
Adhered them to my corner rounded 
white embossed cog background
which is a little hard to see here
on to gold paper and white card base.
My simple Hello is from STAMPlorations
 (needed a tiny sentiment to fit)
heat embossed in gold.
My Mix is
Oxidized Metal, stamping, embossing, die cutting.

Thanks for dropping in today. Love reading your comments.
I will be back to play with this technique again soon.


Tuesday, 18 June 2019

Make a Wish for CAS Mix Up Challenge

Hi and Welcome. Today's post is for the current challenge at
and my good friend Mac is hosting.


I started out by inking Tim's Peacock Feathers Oxide ink
onto my glass mat, wetting it and smooching
with a piece of plastic to try and get an ombre effect
on to acrylic painting paper. Unfortunately it isn't showing
up as nicely as it is IRL. I then heat embossed
my STAMPlorations Feathery feathers with
Colour Blast Deep Water Embossing Powder
and die cut. I then die cut the leaves (Kaisercraft)
with the same paper and flourish (Gina Marie)
To ground my die cuts I painted 
Colour Blast Shimmer in the same Deep Water colour.
Added my sentiment from the same stamp set
then attached my slightly popped feather and die cuts. 
Added a butterfly, wee bow from Waffle Flower
 and a pearl to the centre 
Just to finish it off I added some splatters.
Attached this to  my base. If you look closely 
you can see this paper has a lovely light texture
I thought added a little something.

Here is a close up showing the texture and
lovely shimmery embossing. 

My Mix is - Ombre Technique, stamping,
heat embossing, die cutting and painting.

Thanks for dropping in today.
Love reading your comments

Sunday, 19 May 2019

A 'Fabulous Day'

I'm back today to post my second card for the
You will remember I mentioned that I had made another
with my first posting. 
Here it is!


I used the same colours from one of the baby wipes - 
SU Mossy Meadow, Yo Yo Yellow and
Tim's Carved Pumpkin for my leaves
and the Carved Pumpkin, Yo Yo Yellow 
and Tim's Tea Die for my multi stamped flowers
from SU Stippled Blossoms.
After stamping and arranging them I inked my
sentiment from Darkroom Door.
I dry embossed the background
then inked the corners with the baby wipe.
Added a touch of Nuvo Shimmer to the main flower
then attached to white frame and orange card stock.


My Mix is - Baby Wipe Technique, Stamping
and Dry Embossing

Thanks for popping in - till next time Cherrio

Monday, 13 May 2019

A Blossoming Flower

It's been some time since I have played over at the
CAS Mix Up Card Challenge but this month's technique
has been on my 'To Try List' for a long time
so there was no excuse for me to NOT try it out. 


My Mix is Baby Wipe Technique, Stamping
Die Cutting and Embossing

I used Ramblin' Rose Pink Magicals
on my first baby wipe, wetting it to
activate the crystals and then wiping it on to
card stock several times to get the bright shimmery effect.
The leaves are soaked up with
Tim's Carved Pumpkin
SU Mossy Meadow and Yo Yo Yellow reinkers.
These were die cut from SU Botanical Blooms.
I love this stamp/die set as it is so versatile.
Behind the leaves I inked a few twigs with 
Tea Die Distress Ink as is the lovely sentiment from
You will see faint embossing to the white card.
I only embossed with one half of the folder
to take away the starkness.
I inked the leaf edges with Nuvo Gold Glitter
which is very hard to see.
Added some tiny beads to the centre of my flower
to finish my card that I adhered to kraft card base.
I had a lot of fun with this technique and 
have made another card using one of the
inked baby wipe colours. I will show that another day.

Thanks for dropping in
Love reading your kind comments.