Pages

Thursday, 29 November 2018

It's a Critteroliday Challenge

I had a wee bit of time up my sleeve and saw the
 challenge over at The Mod Squad
Hello and Welcome.
I am just finishing off the last of my Christmas creations
and thought this card would be just perfect.
It was a really simple and quick card to make especially 
for this busy time of year.
My critter is from
and my sentiment 
preview-christmasreindeerpreview-merryandbright
I mixed some Art Alchemy metallique paint in
Rustic Brown with some clear crackle medium
for my stag head and let dry.
 I had some leftover paint on my mat
and decided to use it up on the sentiment
and smashing onto watercolour card for a background.
I cut that with a stitched die then adhered the sentiment
and popped up my stag head. Added a pearl
for his eye. Card base is basic white.
That's all for now
till next time - Thanks for popping in

The Day has come to Show You...

Today is the day I get to post my very first project 
as an Ambassador for the

Here is our Mood Board for November


As soon as I saw this I wanted to do something with
the image of that LONG RED HAIR!
When I walked into the Studio I went looking
for a suitable stamp and found this

and so my journey into Mixed Media really begins.

I heat embossed my image in black
and smooching the background with 
Tim's Festive Berries Distress Ink mixed with 
Forever Red Perfect Pearls to add shimmer.
next came
a bit more colour before cutting with a
Postage Stamp Die.
Now on to the background using
Black Textured Card Stock.
Next step to add a bit of dimension with
Dina Wakley Tornado Stencil using
white texture paste.
and lots more colours with Mica Flakes
Finnabair Glass Beads and Fantasy Snow
with melted red gelatos painted with
Metallic Gold Rush Paint.
Then die cut flourishes in gold and black
and my flowers inked with
Metallic Paint in Red Wine and Rusty Red
 scored to add shape.
Added some yellow glitter to the centre
and a few gold material flowers to the back.
You can see a tiny bit of the original colour
peeking out from the centre of the flower.
I needed to take the stark white away from the
stamped image so inked all around with
a shimmery black wax.
Thought the cut out sentiments were perfect
for this amazing image.
Did you notice I even found an earring
to add from my stash?
Just a few more finishing touches with sequins
then attaching to a corrugated cardboard back
and punched holes to add my gold coil ready for hanging.

Here are a few of the products purchased from the
 Art and Soul Studio - It's Craft Heaven
especially when you get to visit and browse
(takes quite a while)
and relax with scrumptious home made yummies
and an amazing cuppa.
If you aren't lucky enough to visit
you can browse online and purchase.

My Finished Project!


Here are the items I used above and purchased from the Studio.

If you are interested in joining in our Challenges 
you can find all the details
on our Facebook Site Here It can be an Art Journal Page
Card, Scrapbook Layout etc. You can win a
$50 Voucher from Art and Soul Studio 

Thanks for dropping by and taking the time to
check out this longer than normal posting.


Wednesday, 28 November 2018

A Floral Celebration

Hello and Welcome to  today's post for
where we have
the most Gorgeous Inspiration Photo for you.
Off course I love it as there's my favourite colours there.


and - Tim's Wild Flower Dies were perfect
so I cut out a bunch colouring some with a mix of
Lindy's Magical's and Tim's Oxide Inks.
These were also used to back my floral spray
which was cut from a Uniquely Creative Die
which was slightly popped.
I did start off by inking the background with 
some grungy stamps from STAMPlorations in
Memento Lulu Lavender and 
Tim's Stormy Sky/Seedless Preserves.
Flicked some splatters from leftovers on my mat.
I arranged my flowers and adhered some
Press & Seal to hold them together 
so I could pop and glue together.
The Celebrate sentiment is also from STAMPlorations
inked with Memento Elderberry.
Finished with some gems and a cotton bow.
Lightly inked the edges and attached to my card base.


You are going to love what my Team Mates have created
so why not pop over and check them out.
Hope you can come join us in our Gallery this week.
I will look for you there.

Thanks for dropping in
Cherrio for now from


Saturday, 24 November 2018

It's a Merry FAIRY Christmas

It's Saturday isn't it? That means there's
Hello and welcome.
I'm cheating here as the card I have here today
is one I made at a class some time ago and thought it
perfect for  our Photo Week.  Lisa is our Host choosing
such an appropriate photo with 
Christmas just around the corner.


You see those little fairies have tiny gifts
all wrapped up just like the photo above.
 I added  a big gem to dot the fairy that
wasn't part of the class.
Now that this post was so quick head over to
Our Blog and see what our Guest Clair
and the Design Team created and come join us
for our LAST challenge for the year.
Yes - the Jugheads are taking a
wee break in December to spend time
with family and friends and will be back
refreshed in the New Year. 
Lisa will announce our Chic of the Week
as usual the following Friday so don't be alarmed!
Just check back to see if you are the ONE.

I am looking forward to my Christmas break
this year as my grand daughter is moving down
this way to continue her nursing studies
and will be spending Christmas here.

So in closing I would like to Thank You
for all the kind comments you left throughout the year
and wish you
A Merry Christmas and a
Safe Happy Healthy New Year. 


Saturday, 17 November 2018

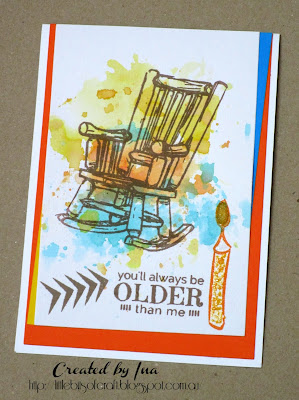
You'll Always Be....

Hello and Welcome to my Saturday Post for
Just Us Girls and this week's Host is Vicki
for our Colour Week.


I have made a few cards similar to this
with that old rockin' chair and sarcastic sentiment.
I think they work perfectly together
and makes a nice easy CAS card.
The stamps and sentiments are all from
STAMPlorations and I simply 
splattered (as I do) my background with
Tim's Peacock Feathers/Fossilized Amber
and Carved Pumpkin.
I added some Nuvo drops and glitter
to the candle and added
coloured paper to the back in matching colours.
Adhered it to my white cards base
and my male card was done.
Couldn't sent that to a female could I?


Pop over and see what Claire our November Guest
created as well as my Talented Team Mates
and join us in this fun colour challenge.

Thanks for dropping in

Wednesday, 14 November 2018

It's 'Holiday Time' at Addicted to Stamps and More

Christmas is a comin' so it's timely that
the New Challenge over at Addicted to Stamps and More
is a Holiday Theme but you don't have to
make a Christmas card - any holiday is fine!
Hello and Welcome. Nice of you to drop in
to see what I have for you today.

preview-LayeredHolly

It's a pretty simple card with some 2 step stamping.
My Holly stamp is from STAMPlorations Layered-Holly
inked with Tim's Distress Inks in
Festive Berries/Crushed Olive/Mowed Lawn.
Added some splatters and glittered up
the red berries.
Sentiment is popped and I add small strips
of red glitter to match the berries.
Simply added both to white card base and I'm done.


Pop over and see what Holiday projects
my Team Mates have made and come join us
in the Gallery this week.
Thanks for dropping in


Tuesday, 13 November 2018

Our 4th 'Giving Thanks' Blog Hop at STAMPlorations

It's our 4th 'Giving Thanks Blog Hop
and Linky Party at STAMPlorations with so much to tell you - 
 I thought it easier to send you For All the Details HERE!
that is - 
after you finish reading my Post!
Here are two cards I made keeping them CAS
 to showcase how gorgeous this stamp set is
with such perfect sentiments suitable for any occasion.


Image may contain: text

I have inked up the gorgeous Grateful Flutters Stamps
designed by our very own Shery Russ. Since I had my
rather neglected Oxide Inks out I decided to use them
for both cards.
Card 1 - I randomly inked my butterflies onto white card stock,
corner rounded, added some sequins and gems
and some tiny inked pink hearts from Balloons & Banners
with my sentiment in black, attaching to 
a hot pink card base.
Card 2 - has the background inked
multiple times to cover then heat embossed in white.
Sentiment is also heat embossed.
Flicked some water marks,
 a bit of grunge from Art Marks
and some white dots from an inked eraser end of a pencil.
No bling needed here.

preview-GratefulFlutterspreview-DAIBalloonsandBannerspreview-SheryRuss_ArtMarks1

There are lots of ways for you to win Prizes - over $200 in fact.
How generous of Shery! 
Hop Leave Comments Visit our Facebook/Instagram sites
 - even tag your friends for chances to win. 
You have till November 30th and winner will be announced
on December 10th in the November Winner's Post.
Oh! Don't forget you can get a 20% discount just by adding
STAMPGIRLINA when you Order!


Now that you have read my Post click on the Link
at the top where everything is explained in full.

Thanks so much for taking time to pop in.
Please check out all the other fabulous projects
from the other Designers and leave them some Love.


Saturday, 10 November 2018

Hello 'Beautiful'

Hello and Welcome to today's post.
It's my turn to Host for our Trend Week at
Just Us Girls
I chose Bleach as it is a technique I haven't tried before
and I know it has been around for an age. 
I'm afraid my card didn't photograph too well.
I think the metallic shimmer made it tricky.
The beautiful Lily Stamp and Sentiment
I used here are from STAMPlorations
 Smile and Hello Coffee
I heat embossed my flower with
Lindy's Pumpkin Fiesta
and then worked on bleaching.
When that was dry I added colour with
some metallic paints. This was cut from
a Spellbinder die with SU Groovy Guava
card stock - same as my base.
I popped that onto some metallic paper
attaching some ribbon to the side.
Sentiment was inked with
SU Calypso Coral. Finished with pearls.


Hope you can pop over and see what our
November Guest Claire and my Team Mates
created for your pleasure and get time
to get out some bleach from the laundry
and play with us this week.
Look forward to seeing you in our Gallery.

Thanks for dropping in and leaving
such kind comments.

Friday, 9 November 2018

A Very Special 'THANK YOU'

Hello and Welcome to a Special Post.
Each year I make a card with Poppies 
for Remembrance Day in Australia.

Image result for remembrance day

This post is a few days early but thought it
perfect for our Anything Goes with Dies at


I kept it CAS using a background
done with predominately Red Alcohol Inks on Yupo Paper.
I cut the Perky Poppy from my Memory Box Die
and attached to the background.
Added a frame and a simple Thank You
sentiment in gold.
Pop over and see more die cuts from my Team Mates
and come join us this month. 
All the details are Here


Thanks for dropping in


Tuesday, 6 November 2018

Time to Give 'Thanks'

November has come around and it is time for our 
New CUTplorations Challenge over at
Hello and Welcome to today's Post.


I started my card by smooching a background with
Lindy's Magical's in Rose Pink then stenciled
with ARTplorations Droplets with clear embossing powder.
My background for the floral stamp was sponged with
Tim's Abandoned Coral, Carved Pumpkin,
Fired Brick and Ripe Persimmon
I then got out my Bloom Sketches and randomly
stamped again using  Ripe Persimmons in a shadow effect.
I added glossy accents to the centre of the main flower
 and while wet sprinkled with
 Stampendous Aged Copper Embossong Enamel
but did not melt it.
Added a touch of Nuvo Crystal Glaze to the other two flowers.
I added a small frame in a lighter pink then popped
to my droplet background and finally to 
SU Groovy Guava card base.
Finished with my Thanks sentiment from 
and some scattered pearls.

preview-web-stencil-029-droplets.jpegstmp1053.jpegpreview-Fluttery-dies


Pop on over and see what my Team Mates have made
for your pleasure and come join us in our Gallery.
Don't forget there is a 20% discount to entice you
just by using my code - STAMPGIRLINA.
Thanks for dropping in