Pages

Saturday, 12 January 2019

What the 'Trend' this week at Just Us Girls

Hello and Welcome to my Saturday Post for
Vicki is Hosting and chose a popular one
Emboss Resist Technique!


It's a favourite of mine and I found
This Tutorial by Kate Palmer on You Tube
 that is just that little bit different and 
virtually cased her design. 
I inked my backgrounds with the same inks
usingthe flourish from SU Bliss with Archival Watering Can
and Archival Black on the Stampendous Script.
I then inked up my Bohemian Damask stencil with
WOW Atlantic Sea Spray Embossing Powder.
As you can see it has gold speckles which really
added so much to  the stenciling.
I then had loads of fun with some new Lindy's Sprays
in Tiffany Lou Blue and Witches Potion Purple.
(Love the shimmer)
I sprayed a few times to get the bold colours.
We all have an over abundance of ribbons etc and
since I haven't touched mine for such a LONG TIME
this was a perfect time to cut them 
to add to my emboss resist background.
I then cut out my leaf background, flourish
and some fern to add to the back of my flower.
It is a MFT Heirloom Rose die cut several times
and sprayed with Lindy's. 
Added some cord in front of the background
then attached my flower.
Sentiment is STAMPlorations FlutteryStamp/Die.
Finished with Nuvo Glitter drops and
attached to coloured card base.
I know there will be a few that love the colours here - 
just happens they were some new Lindy's Sprays.
A close up of the embossing glitter and shimmer

Pop over and see what our Guests
Janet and Cindy created
and my Talented Team Mates.
Come join us in the Gallery.
You could be our Chic of the Week
and be in the running to join us as Guest in March.
Thanks for dropping in.
Love reading your comments.


Tuesday, 8 January 2019

A Textured Mixed Media Project for Art and Soul Studio

Today is my turn to showcase what I made with taking inspiration 
from the January Mood Board over at


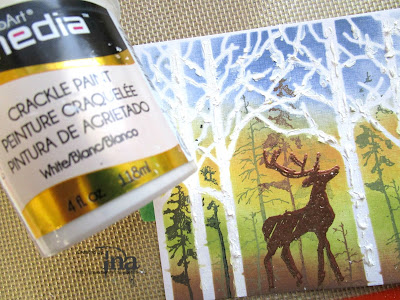
As you can see I honed in on the Deer and Trees.
***
I started my project by choosing the
Memory Box Garden Birch Landscape Stencil


then started sponging with Tim's Oxide Inks in
Faded Jeans/Spiced Marmalade/Fossilized Amber
Pealed Paint and Vintage Photo


Then with the stencil still in place
 inking my trees in a variety of colours with
Memento Pistachio/Olive Grove/MementoLuxe Northern Pine
Versafine Clair Fallen Leaves


Checking out to see where to place my Deer
This is part of the Tim Holtz Great Outdoors CMS321 set
I purchased from the Art and Soul Studio as are the trees above.


Removed the stencil then
I heat embossed him with Ranger Copper and a second time
with Ranger Potting Soil.
 

Next came texture to the trees with DecoArt Crackle Paint
allowing it to dry naturally.


More texture was added for the ground using
Artisan Powder in Parisan Rosewood
Tim's Distress Stain in Gathered Twigs 
and VersaFine Clair Fallen Leaves
mixed with DecoArt Texture Sand Paste.


and stenciled with Scratchy Stencil by Kaisercraft


Inked the edges then attached to a blue back.
Decided to add a backing with brown card stock
with a Stamperia Formato D (KSD282) stencil
using Nuvo Toasted Almond Mousse.
(Still not sure if I like it)
Added touches here and there for effect on the trees
and on the ground.
The trees were also coloured with an Antique Linen Pen.
Finished with distressing the background .
Main image is popped.
Sentiment is die cut from MFT Stitched Die
heat embossed in white.

A few close ups!


The Art and Soul Studio give away
$50 vouchers to their store for Australian Residents
as prizes and overseas contributors are
invited to be Guests. Why not come join in 
and add your creation Here
this month and you could be a lucky winner!

Products from Art and Soul Studio are
Tim Holtz Great Outdoors Stamp Set
Stamperia Stencil
Kaisercraft Scratchy Stencil
Artisan Parisan Rosewood Powder
DecoArt Texture Sand Paste
Nuvo Toasted Almond Mousse
VersaFine Clair Fallen Leaves.


Hope you liked my project.
Till next time Cherrio!


Big Hugs for CUTplorations.

Today's post is for the January Challenge over at
STAMPlorations. It's the CUTplorations Designer's turn
and you can see all our creations  HERE!

What can you do with  these bold bright colours?
I chose to do a background  with a mix of
Finnebair Art Alchemy Metallic Paints
diluted in a little water.
and Versamarked through it then heat embossed
with clear embossing powder.
Added small strips of gold paper 
on the sides then cut my
with the same gold paper.
Finished with some gold splatters and 
adhered to white card base.

preview-evolutionpreview-flutterzen2layeringdies0preview-bighugs

Sure hope you get a chance to play this month.
As always there are great prizes to be won.

Thanks for dropping in