Pages

Monday, 23 December 2013

That LAST MINUTE TAG DCC1218


Talk about last minute - my tag below certainly was that.
I had to make one to put on my niece's gift.
 I had made a few tags as part of my DT duties
 but did not match the ribbon I used.
Fortunately I got to use a new stamp I got from Repeat Impressions


It came together fairly quickly. I used some Christmas scrapbook paper and inked the
Repeat Impressions Tree Stamp 2719 with white and glitter embossing powder,
 added some small red dots with Liquid Pearls star dust stickles and dimensional magic
a strip of gold ribbon and edged with a MS punch.
Finished it off by adding a present under the tree and a few stars and red pearls.
Phew - all done...
Now just need to pack the car and head down to my niece's house for Christmas.
 
Wishing all my Blogger friends a
MERRY CHRISTMAS.


Wednesday, 11 December 2013

It's TAGGED


IT'S THE FINAL DRAGONFLY CHALLENGE
 
Don't worry -  it is just for this year. We will be back on the 22nd January
to entice you with another year full of interesting challenges.
 
But for our final challenge it is for all those last minute
 Christmas Gifts that need TAGS.
 
As my children/grandchildren are older and don't live close by
I put money in their accounts so they can save up for something really special
like my grandson did and bought himself an expensive cricket bat
or maybe just pamper themselves.
I do however make a few for relatives.
 
So to get on with the challenge and stop blabbing -
 
We are looking for tags you make to put on those
all so important gifts you spent either making or buying.
 
Our generous sponsors for this challenge are
 

with 4 digi's of the Winner's Choice
 
and
 
the somewhat cute somewhat quirky Q K R Stampede rubber stamp company Rubber Stamps, Gold Leaf, Foil, and Glass Beads for Stampin, Scrapbooks, Card Making, and Paper Crafts
with 5 digi's of the Winner's Choice.
 
I selected my image from QKR Stampede
 (QKR 19603 Pine Cone Accent)
 
I got carried away and landed up making three tags.


I used Spellbinders Labels 18 on this tag for the back tag.
Inked with distress ink to highlight the Cuttlebug Christmas Embossing Folder.
The top tag has 3 layers coloured slightly with different coloured Distress Inks
The Digi image was coloured and added Stickles Frosted Ice on the
cones to represent Ice. Added dimentional magic to the leaves and topped with glitter.
Again I used a Cuttlebug embossing folder on the image.
Added an embellishment from my stash and some twine to hang it with.


What can I say about these 2 tags - hmm
Of course I used my digi from QKR
I used 2 postage tags inked up with various coloured
 distress inks some PearEx for shimmer a few stamped images
white crayon on one of the tags again to try and get a snowy effect
burlap (hessian here in Australia) behind the digi and to hang one of the tags
 MS punch Spellbinder Circles Dies
JustRite Die Christmas ribbon Glitter Gems
and on the image I used Diamond Dust but could not get
a true photo of how the cones sparkle.
 
I think I have covered all the goodies I used on these tags.
As you can imagine there were products spread far and wide
in my craft room to create these tags.
Hope you were inspired to make some tags for our last challenge
and look forward to seeing your work.
 
Don't forget to check out the other Design Team Members Blogs
on the right hand side to see their gorgeous tags too.
 
That is it for me for my Dragonflies Challenges for this year
and would like to thank Hilde for inviting me to be a
Designer on her Team. I have enjoyed these challenges
as it has certainly had me out of my comfort zone a few times
but in doing so has given me the chance to explore and enjoy
my craft in different ways.
 
I would like to say Thank You to all those that have been so kind in
leaving me lovely compliments during the year
and wish you all
 
A Merry and Safe Christmas
and a Happy New Year.


Tuesday, 10 December 2013

It's Sketch Time at The House # N2713


I have said it before but will again - one of my favourite sites to go to for some
and there is just a wee bit of time for me to enter their current
What If Wednesday Sketch Challenge which can be found HERE
 
 
20131126-225542.jpg
 
I went away from a Christmas card for this one
and decided to go a bit flowery.
I kept pretty much to the sketch.
Found some pretty DP to use as a backing
which started off with the usual white cards stock.
 I topped that with another piece which I embossed with
Polka Dots from QuicKutz. Cut 2 pieces of coloured card stock
with SU Edgelets Adorning Accents.
The floral image and sentiment is from GinaK. I touched the back flower
with a coloured gel pen fuzzy cut a second one popped it and
 added a little dimensional magic to the centre and a few gold dots to the stamen.
Finished off with 3 small pieces of ribbon and 2 brads.
 
I recently won their $25 gift certificate and bought some great stamps
which I will be using soon for their Christmas with Trees Challenge - HERE.
 
Thanks for stopping by. I really appreciate your comments.


Monday, 9 December 2013

It doesn't snow here ...but


Christmas and Winter come together for the Northern Hemisphere and
Christmas where I live is Sunny and Hot but
I do like playing with snowmen and you can't have them without
 adding lots of bling or sparkle. 
 
This bring me to why I am here.
Over at Send a Smile 4 Kids I found a great challenge
that suited my little snowman.
 
 
My card was really a simple one with the basic white card stock
and topped with blue. I embossed the card stock with a Cuttlbug embossing folder
glammed it up with some Star Dust Stickles.
My little snowman (small snowflakes and sentiment) is a stamp from GinaK
 which I coloured in non traditional Christmas colours for something a little different.
Finished it off with more glitter including some at the bottom to
try and represent snow. The snowman has Stickles Frosted Snow on his body.
 
Looking at him makes me feel a little cooler
but I certainly wouldn't like to have snow outside my house
as I love the warmer weather. Of course photos of snow covered
trees and houses are lovely to LOOK at.
 
Thanks for stopping by.
Check back on Wednesday for something else I have been having fun with.


Wednesday, 27 November 2013

Christmas is COMING.

 
Time to try your hand at making some Christmas Tree Trimmings
and our Challenge this fortnight
at Crafting with Dragonflies is to make a
 
CHRISTMAS ORNAMENT FOR YOUR TREE OR WALL.
 
 
Some time ago I bought a pack of empty baubles that you pulled apart
and added photos to - perfect for one of the digi's  picked from our sponsor


and the above photo is one that I played with.
They are double sided so I decided to use 2 different images.
I coloured and added glitter to them and around the edges.
Also added - big tartan bow, small bows ribbons
 and a few other little embellishments.


Not the easiest things to photograph so please excuse
the quality of these photos.
 
Hope you find a little time to create something for your tree or wall
for our latest challenge. We sure would love to see them
 
Also don't forget to check out the other Dragonflies on the right side bar
to see what lovely decorations they have made.
 
Thanks for popping in - always appreciate you taking the time to do so.
 Till next time -  Cherrio from


Tuesday, 26 November 2013

WHW #124 Tutorial


When I saw the latest Tutorial over at Inspired by Stamping 
I was fascinated with the result that Kendra got from such a simple little trick  HERE
by using painter's tape.
 I was hoping I had time to play with this and so pleased I did.
 
 
I used the technique on the 3 banners underneath the flower and
also the strip under the ribbon inking with the 3 colours I used on the banners.
Products I used are -
Cream Parchment card stock although it looks white.
Marianne Designer Paper - Dark Vintage
IBS - Vintage Labels 1
IBS Vintage Frames for Sentiment
Johnson & Johnson Cloth Tape for inking
MS Leaves
Distress Inks - Festive Berries Antique Linen Frayed Burlap
and Memento Pistachio
Store bought ribbon flower.
 
Sure hope you like my take on this tutorial.


Monday, 25 November 2013

November Blog Hop - IBS Crochet Trim & Ribbon

The latest Stamp Release over at
Inspired by Stamping was full of beautiful Vintage images.
So what better way to try one of them on this latest challenge.
 
 
Items I used
Cream Metallic card stock.
Merci Vintage Romance paper.
Marianne Die CR1204.
Cottage Cuts Oval Doily/Frame and inked background.
with stamp from Vintage Dress Form (New Release)
All stamps used are from the above stamp set.
Distress Inks - Frayed Burlap Antique Linen Victorian Velvet.
Ribbon from Kazazz and from stash.
Crochet Trim from IBS
Flowers from IBS
Tiny pearls
Fuzzy cut the silhouette frame after inking
 the necklace with distress embossing powder.
I really enjoyed making this card as the majority of goodies
came from Inspired by Stamping.
 If you haven't been there I urge you to do so. You won't be disappointed.
 
Thanks for coming by.
 I really appreciate it especially when you leave comments.
Hope you will come back again.


Thursday, 21 November 2013

An IBS Challenge - November Blog Hop


One of the challenges over at Inspired by Stamping
is their November Blog Hop which is to use Ribbon or Crochet Trim
The details are HERE.
 
I have intentions to make a few cards as I love using both.
For this card I went really cas. I recently purchased some beautiful ribbon
while visiting my sister. She had a quilting friend over from Scotland
and we went to a fabric store close by.
I can't resist lovely ribbon so made a small purchase.
 
This is what I made.
 
 
I used metallic sculptured card stock as my base and
textured paper behind the main top which was
embossed with cb textile folder which I inked lightly..
I tied the organza ribbon with shimmer embroidery thread
and added a flower from IBS
The sentiment is from IBS Vintage Dress Form here
inked with Rich Razzleberry by SU
Kaisercraft Pearls were added to the corner.
 
That is it for now but I am sure to be back with more
ribbon/crocket trimmed cards.


Sunday, 17 November 2013

An IBS Challenge - #68


It is again time for me to create a card for one of the current Colour Challenges
 over at Inspired by Stamping

 
I wasn't sure of what the parchment colour was so googled it
and found it could be a tan colour. I do see a little of that
in the Inspiration Photo so that is what I went with
to match up with the others.
If I am incorrect at least I have made a card to add to my stash.
 And the one below is what I chose.
.
IBSIC-68
 
I started with basic white card stock the added leathergrain textured paper
 which I stamped randomly with a floral stamp and cut in strips.
Again I used the textured paper as a background for my bird image.
The focal flower is inked and has a little gold glitter added with a gel pen.
Added a bright sun near the bird.
 
Products I used
White and leathergrain card stock
Cuttlebug Embossing Folder - Bird Call
Spellbinders Circles/Lacy Circles
IBS Stamps - 
Graceful Hydrangea (background)
Elegant Flowers (focal point)
and the New Release Vintage Dress Form  Here (Sentiment)
IBS Crochet Trim.
Kaisercraft pearl.
 
Thanks for stopping by. Hope you will call back again soon.


Wednesday, 13 November 2013

Crafting with Dragonflies - Stickpins & Things with Wings.

 
It only seems like a few months ago that we started our
fortnightly challenges over at CRAFTING WITH DRAGONFLIES
and here we are into Challenge #15
which is to
Make a card with Stickpins - Things with Wings
Personally loved this one.
 
 
This is a photo from the internet of the most beautiful butterfly
in Northern Queensland which is
The Ulysses Butterfly.
 
 It was with this butterfly in mind I decided to go with the beautiful blue
 as the centre colour of my card
I had so much fun making it as I love a bit of Vintage
 Lace Ribbon Flowers - you get the idea
and who doesn't love butterflies?
 
 Our generous sponsor for this Challenge is
 
Crafts and Me
who will be supplying the lucky winner with 3 digi's of their choice.
 
Here is my finished card with
3 stickpins (one didn't look enough) and butterfly.
I did have a lovely little stickpin with a butterfly on
but got side tracked inking my butterfly I forgot to look at it
and .... well... it didn't match so went fishing for some others I knew I had in my stash. 
 
 
Products I used
Aqua card stock
Parchment paper
Designer papers - patterned and spotted
Decorative Labels 27
Laser cut butterfly
Spellbinders Flourishes
Kazazz ribbon
Peacock Feather & Antique Linen Distress Inks
Kaisercraft pearls
Pins - 2 cream hearts and round ball I adhered
glossy accents to it then covered it with PearEx #681
I lightly spritzed the back of my card with irridescent medium
but is not showing up clearly - just added a bit of sparkle.
My pretty little flower is from Inspired by Stamping
added the finishing touch.
 
Don't forget to pop over to my team mates
to see what beautiful winged cards they have made too.
Their blogs can be found on the right hand side.
 
Thank you so much for coming by to see my work.


Monday, 11 November 2013

A Perfect Sentiment Sketch PSC #99

 
It is Sketch Time over at


As you can see it is a nice simple one
Here is my take on this sketch.
 

I went for something CAS and this is the materials I used -
Basic White card stock
Craft Concepts Funky Flower for embossing
Small piece of scrap paper which I inked with
SU Beyond the Basics stamp using Distress Inks -
Victorian Velvet  Frayed Burlap & Spun Sugar
Sentiment & Flowers are from Gina K -
Springtime Silhouettes.
 I stamped twice and masked the third.
Added a little glitter from Martha Stewart to the centres of the flowers
and to the side strip. Also touched up  the embossed backing with a
gold gel pen and inked the edges.
 
That is it from me for now.
Hope you will pop back in sometime soon.


Monday, 4 November 2013

First Challenge of the Month at JUGS


The first challenge of the month over at JUGS
 
is this fabulous sketch from Sharyn


I love sketch challenges and as Sharyn said - half the work is done for you.
Now we just need to make a card with our take on it.
 
I must admit the first card I started just wasn't right so
landed in the bin lol
Now this card I was really happy with because I went
to my favourite Stampin' Up set - Vintage Vogue
and what better colours to use but SU Rich Razzleberry for the
flowers and Memento Pistachio.
 
I started with the basic white card stock
and after inking and masking the strips of paper
with another stamp from
Vintage Vogue I adhered to the base.
Added a strip of DP from Creative Memories and punched
the bottom part with a MS Punch.
The Spellbinders Lacy Circle was cut from a scrap piece of
scrapbooking paper then followed by the white from Spellbinders Standard Circles
 inked with the flower. I inked several more flowers and fuzzy cut
curled and popped them  to add to the top and also the side as per sketch.
Finished off with tiny rhinestones in the circle and 2 larger ones on the
edge of the strip. Also pearls from Kaisercraft to 2 flowers
and a mauve Sparklet on the other flower.
 
Hope you liked my interpretation of this great sketch.

I am also entering this card in the Just for Fun Challenge HERE
http://laineyscraftyspace-justforfun.blogspot.co.uk/
 We are required to use our favourite colour.
Those that know me are well aware that mine is PURPLE

Maybe it is because my favourite flower is a thistle.
 I know it is a weed but being a Scot you have to love them.

I would also like to be considered for GDT.


Sketch Challenge #03013 at The House


In my last post I showed you a card I had made for  Sketch Challenge #03013
 
and just in case you missed it here it is again.
 
20131029-211940.jpg


A girlfriend bought me the beautiful card stock I used for the base and is
Metallic Mother of Pearl which I though a perfect match for the
red & gold patterned shimmer paper I used as the backing for my focal image.
I cut out a die from Spellbinders Floral Ovals in gold and topped with
a smaller die from the same set with the metallic paper.
The Poppies are a Memory Box die.
I heated the organza ribbon with my heat gun to get the crinkled effect
 to the right and finished it with 3 red Kaisercraft pearls.
 
Hope you have enjoyed looking at my cards for this challenge.
 
Thanks for popping in.


Sketch time at The House


One of the current challenges over at http://www.thehousethatstampsbuilt.com/
is the Sketch Challenge and you can find out all the details  HERE
 
and this is the sketch
 
20131029-211940.jpg
 
I have made 2 card with this sketch and here is the first one.


I really love this tree stamp from Repeat Impressions
because it makes a cas card look fabulous.
I have previously made a card with this tree and used the same
embossing enamel and loved the effect so  decided to
make another one and go just a little bit further
 and use it for the strip underneath the tree.
 
My card base is white and topped with gold paper.
I then used the following products on this card -
 
Spellbinders Blossoms 3
JustRite Thank You Labels 20 (Sentiment)
Repeat Impressions Spring Tree - 1610-W
Victorian Velvet Distress Ink
Stampendous Aged Rose Embossing Enamel
Gold Sakura Gel Pen
Plum Pearls by Kaisercraft
 
I will be back soon with the second card I have made for this challenge.


Thursday, 31 October 2013

JUGS #212 Photo Inspiration.

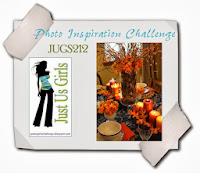
Over at Just Us Girls their current challenge is a photo inspirational challenge
 and isn't the photo below just gorgeous.
 
You can find all the details HERE.
I know it isn't fall time over here in Australia but we still love
the colours associated with that time of year. The trees look so beautiful.
 
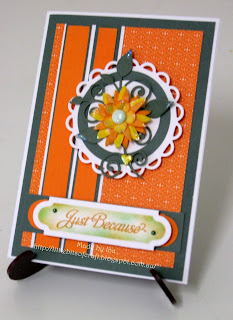
For my card I went for a simple design to highlight the colours above.
My card didn't photograph well as the background paper
is actually green but looks grey.


I layered it up a little by adding the green card stock to the white base.
  Then followed up with Designer paper from Stampin' Up
  a little more white and green to back the orange paper which I scored.
I then used Spellbinders Lacy Circles in white and
Spellbinder Standard Large & Small Circles in the green and white .
Behind my flower I added a leafy swirl from Fancy That.
We tend to forget the flower packs you have bought and use
dies to create our flowers (well I do) so this time
I got a few out and built them up - inked a little and added some
star dust stickles and brad.
I was looking for something tiny to put at the bottom of my flower and found this
perfect little heart in just the right colour.
The sentiment is from Inspired by Stamping - Fancy Sentiments
Tag is JustRite Antique Tags.
Sponged the inside to add colour and finished with 2 small pearls.
Flower and sentiment are popped.
 
Till next time


Wednesday, 30 October 2013

CWD Challenge #14 - Make your own Flower Embellishements.


Challenge Time Again at

Crafting With Dragonflies Challenge Blog
and you are going to love this one...
 
Challenge #14 - Make Your Own Flower Embellishments
Our sponsor for this is
 

Sponsor's Page

Here is my card for this challenge

 
Some of the Design Team have gone sponsor free
for this challenge and I was one of those.
I love making flowers and building my cards up
so this challenge was right up my ally.
 
There are quite a few different elements used here and they are -
Curious White Gold & Metallic card stock
Antique Flourish Embossing Folder by Mpress
Spellbinders Fleur De Lis Die
Spellbinders Radiant Rectangles
Sixxiz Textured Impressions Frame
Spellbinders Decorative Labels 27
Spellbinders Tags
Marianne Die for Leaves
Gina K Sentiment
M/S Kunzite Glitter on
Tim Holtz Tattered Floral Die
Own Cream Lace
Pink Pearl Brad for centre of Flower.
 
I hope you like what you see and I would be so happy
to see your comments.
Thanks for stopping by.
 
 I look forward to seeing your take on our
Make Your Own Flower Embellishment.
 
Don't forget to pop over to my Design Teamies
to see what they created for this challenge.
Their blogs are on the right side of this page. 
 
Till next time